Like for the first encounter between two strangers, a critical aspect for a mobile app when it meets our new users, whether we like to admit it or not, is the first impression.
The splash screen is the very first thing our users got to judge our app the very first time they launch it, the way we make it blend with our app UI, possibly giving it a functional role, can greatly increase the overall perceived quality, and if done poorly it can as well obtain the opposite effect.
Notice that the following procedure is executed with PhoneGap version 3.3.0, thus valid from version 3 and above.
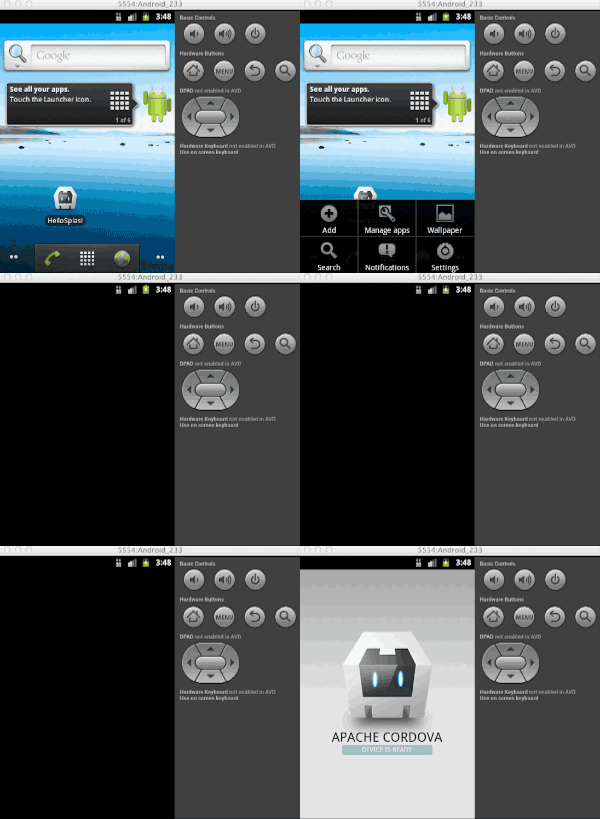
So the first thing I did was to create an Hello World project, which I named HelloSplash on GitHub, to see how this is handled, assuming such a common feature would come just out of the box, so I just build the project and launch it in an Android 2.3 emulator (HelloSplash tag v1.0.0).
Not nice, at all, a pitch black screen until my app UI renders in a flash is not what I’m looking for.
Next step I did was to look for some documentation about how to handle a splash screen and came across the official splashscreen API reference.
After following the setup instruction I created all the different resolutions of my test image, a trick to handle this quickly is to create the main document starting for the XHDPI resolution, then you can obtain all the resolutions by downsampling during the export operation with following percentages :
- LDPI : 38%
- MDPI: 50%
- HDPI: 75%
- XHDPI: 100%
Now that we have the images we put them into their relevant folders which are :
/hellosplash/HelloSplash/platforms/android/res/drawable-ldpi/splash.png
/hellosplash/HelloSplash/platforms/android/res/drawable-mdpi/splash.png
/hellosplash/HelloSplash/platforms/android/res/drawable-hdpi/splash.png
/hellosplash/HelloSplash/platforms/android/res/drawable-xhdpi/splash.png
Rebuild the app, and nothing changed…why? We did followed all the official instructions but comes out something is wrong on this line of the documentation :
In config.xml in the project’s www directory, add the following preferences
Fact is that in the project there are three config.xml :
/hellosplash/HelloSplash/config.xml
/hellosplash/HelloSplash/www/config.xml
/hellosplash/HelloSplash/platforms/android/res/xml/config.xml
The one that will actually be executed by Android is the last one of course, the docs advise us to edit the second because they think that one will be used to update the third during the build process but it is completely ignored, what gets the work done is the first one, so the file we want to edit in order to update the compiled file is hellosplash/HelloSplash/config.xml with the following :
<preference name="SplashScreen" value="splash" />
<preference name="SplashScreenDelay" value="10000" />
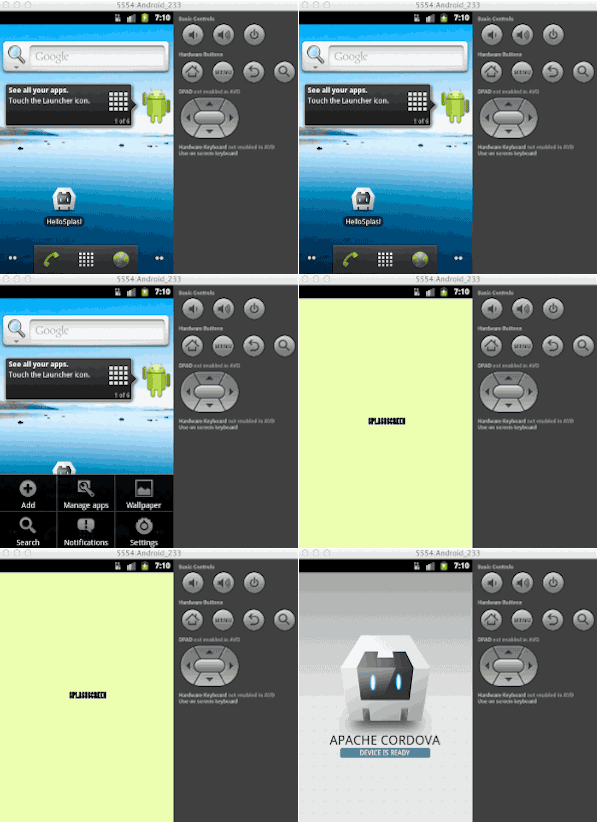
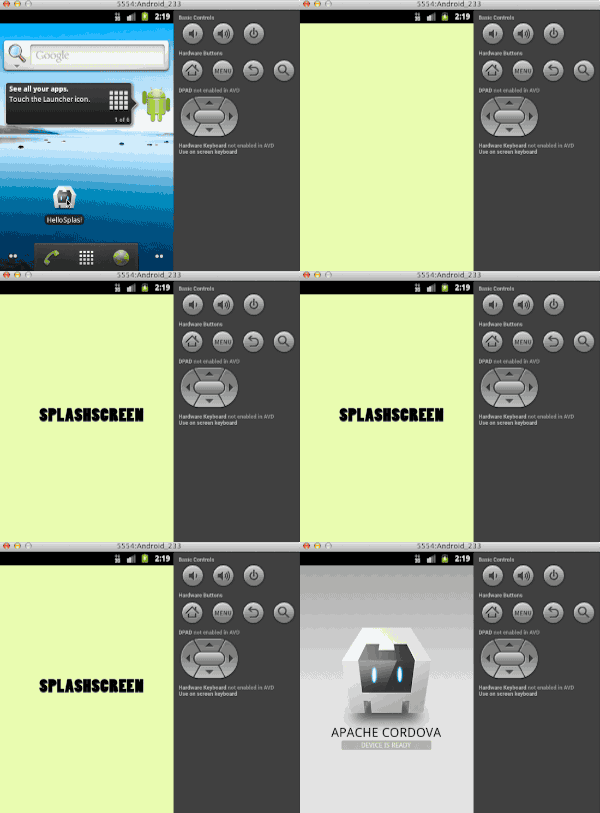
Rebuild the app and now we do have a splash screen, however we still have the first pitch black screen too.
(HelloSplash tag v1.1.0)
Also you can notice how the image fades in but does not fade out, even calling the navigator.splashscreen.hide() method directly the screen would just disappear in a bump, revealing our UI in a brute way.
Unfortunately the plugin doesn’t provide any mean of customization of these aspects. If we want a more “professional” and appealing feeling to the splash screen we will have to get our hands dirty outside the box of the www folder.
Startup phases of a PhoneGap App on Android
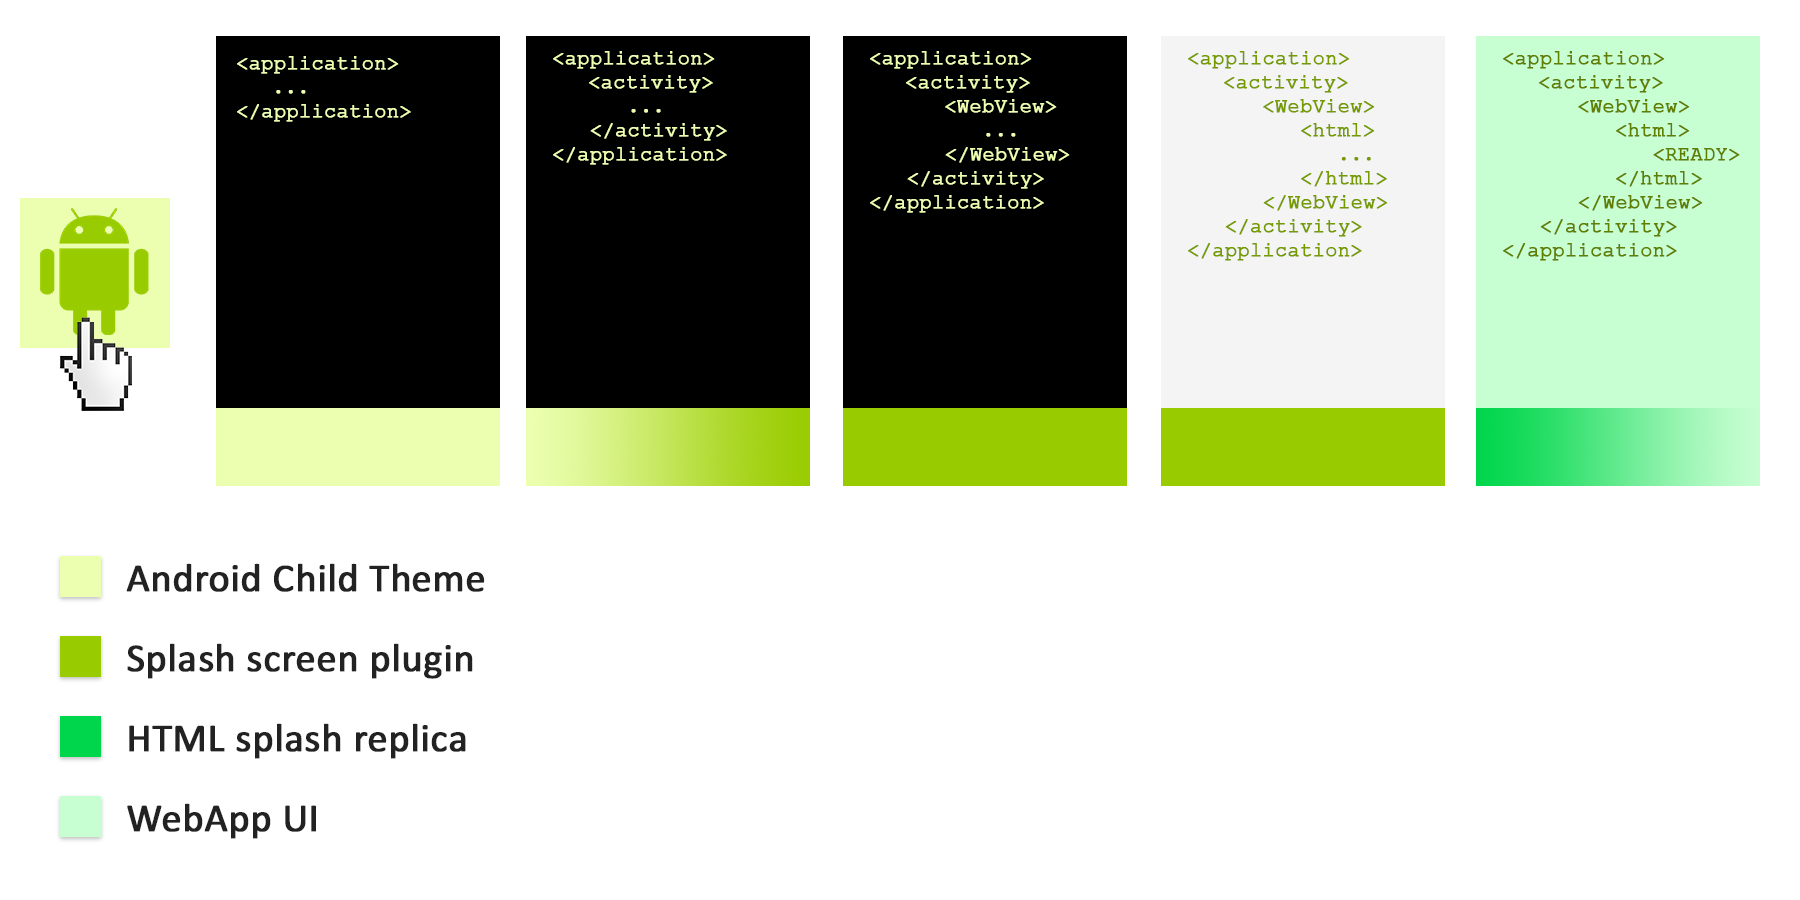
To understand how to fix the issue we need to understand the flow and steps of the application startup process, which is actually a five steps process and each displays to the user a different screen in fast succession :
- Android application window
- Activity window fade in
- Empty WebView frame
- HTML document loading, white screen
- HTML page rendered, CSS and JS resources have been loaded and executed
Before we start addressing these points give a peek to the Android UI Themes official documentation, nothing to be scared about.
Change the Android application window background with native child theme
The first black screen is the Application Window background, the empty native Java container that wraps our HTML web app, and the color we are seeing comes from the native theme the app is assigned.
Every PhoneGap project we create ships with a default theme declared in the AndroidManifest.xml, it’s the last attribute of the activity tag :
<?xml version='1.0' encoding='utf-8'?>
<manifest android:hardwareAccelerated="true" android:versionCode="1" android:versionName="0.0.1" android:windowSoftInputMode="adjustPan" package="com.coolappz.HelloSplash" xmlns:android="http://schemas.android.com/apk/res/android">
    <supports-screens android:anyDensity="true" android:largeScreens="true" android:normalScreens="true" android:resizeable="true" android:smallScreens="true" android:xlargeScreens="true" />
    <uses-permission android:name="android.permission.INTERNET" />
    <application android:hardwareAccelerated="true" android:icon="@drawable/icon" android:label="@string/app_name">
        <activity android:configChanges="orientation|keyboardHidden|keyboard|screenSize|locale" android:label="@string/app_name" android:name="HelloSplash" android:theme="@android:style/Theme.Black.NoTitleBar">
            <intent-filter>
                <action android:name="android.intent.action.MAIN" />
                <category android:name="android.intent.category.LAUNCHER" />
            </intent-filter>
        </activity>
    </application>
    [...]
</manifest>
Our app is composed of a single activity that uses the Theme.Black.NoTitleBar.
In order to override some aspects of this theme to fit our needs we are going to create a child theme that refers to this default theme as parent and change just what we need, basically overriding things as we would do with CSS specificity.
As the docs says the file name that stores our styles can be anything, but for simplicity sake I recommend to name it just style.xml to avoid confusion, so here’s the full path and content, we’ll use the same color present in our splash screen images:
hellosplash/HelloSplash/platforms/android/res/values/style.xml
<?xml version="1.0" encoding="utf-8"?>
<resources>
    <color name="hellosplash_window">#b9ff74</color>
    <style name="HelloSplashTheme" parent="android:style/Theme.Black.NoTitleBar">
        <item name="android:windowBackground">@color/hellosplash_window</item>
    </style>
</resources>
Now to allow our app to use our theme’s styles instead of the default theme in the AndroidManifest.xml we need to change the activity tag’s last attribute from:
android:theme="@android:style/Theme.Black.NoTitleBar"
to
android:theme="@style/HelloSplashTheme"
Notice how after the At symbol we omit “android:” because we’re not referring to a global style included by default in the Android OS anymore but to our theme name stored in our style.xml file.
Prevent WebView and HTML loading flicker with a short delay
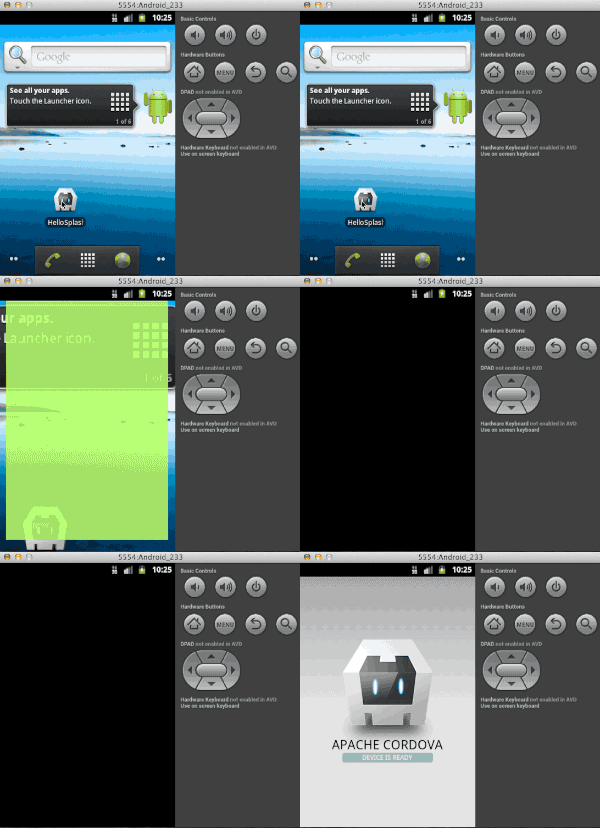
If we comment the last two lines we added in the project root config.xml to deactivate the splash screen plugin temporarily and build the app we’re going to see clearly all the phases enumerated before.
We can see now that the first colors that welcomes us is not the pitch black like before but the color we just defined in our custom theme, also without the splash screen we can see that the impression we had of the image provided with the plugin fading in was wrong as it’s actually the whole activity window that fades in, which happens to show our splash image as instructed in the config.xml.
But we notice two more effects, after the activity fade in follows a black/white flash then HTML page suddenly appears, what happens here is that WebView gets initialized into the activity window, then starts loading the assets thus showing us the blank HTML page, finally the resources are parsed and our web app appears.
These steps, listed above 3 through 5, were masked by the splash screen plugin for which we didn’t put an hide callback in our JavaScript, so by the time we had set for it to last we’re presented with step 5, when the page is already up and running.
Like the official documentation of the plugin recommends, we do not want the splash screen to stay up for the whole time we set in the config.xml, instead we should make it disappear as soon as our UI is ready, or better when the document is ready.
But if the splash screen gets hidden upon document ready there’s still an instant of black screen before our HTML appears, after several test I discovered that one second and half of delay after the document ready callback is safe to ensure that the page below is actually visible, so lets add the following lines inside the receivedEvent function of www/index.js :
$(document).ready(function(){
            setTimeout(function(){
                navigator.splashscreen.hide();
           },1500);
        });
When the splash screen goes away we have the page up and running below, still it does without any fade effect which is not very nifty, but at this point of the work we are on web technology field, we now have full power at hour hand to handle this 🙂 .
HTML stand in for splash screen fade out
The first thing we would want in our HTML is a div that has as background image the one we use as splash screen, so that when we hide the splash screen we do not notice any difference as we’re still seeing the same image, only now we can apply a fade out animation to the HTML specular element.
Let’s copy the drawable-xhdpi/splash.png image under our www/img/ directory to be accessible via CSS, now in index.html we want the first child of the body to be :
<div id=“splash”></div>
to apply the following styles :
#splash {
    background-attachment: scroll;
    background-color: #ecffb1;
    background-image: url(../img/splash.png);
    background-position: center center;
    background-repeat: no-repeat;
    background-size: 450px auto;
    display: block;
    height: 100%;
    width: 100%;
    position: fixed;
    z-index: 10;
}
then in the time out function we just created let’s add a fadeOut to the div :
$(document).ready(function(){
            setTimeout(function(){
                navigator.splashscreen.hide();
                $('#splash').fadeOut();
            },1500);
        });
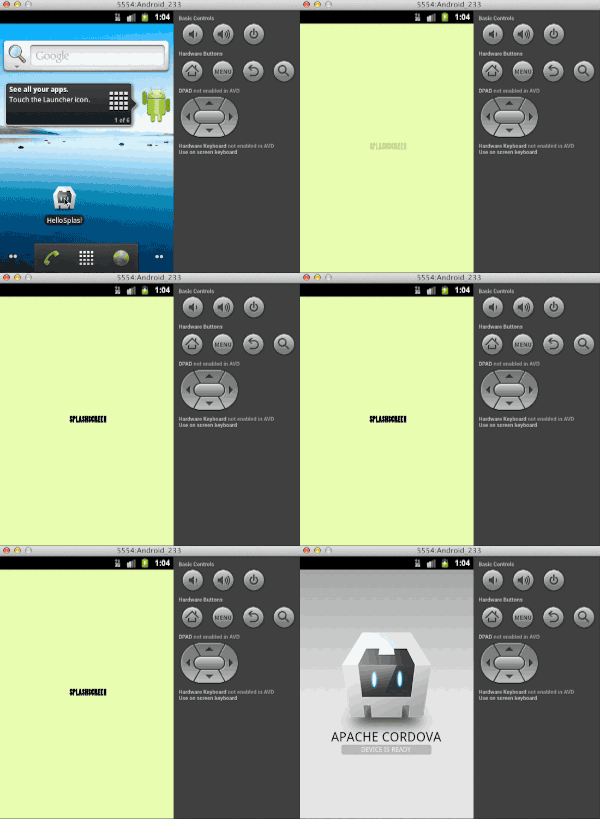
Now the application launches with our color, our logo and fades in nicely, then fades out to reveal our web app.
(HelloSplash tag v1.2.0)
Almost what we want, you noticed an issue right?
The aspect ratio of the image changes, what’s happening is that we’re using for the splash screen a set of images thought to be bigger than the screen in order to fill all the visible area, but on Android any native UI element that shows a picture if not instructed on how to handle such content will automatically stretch it to fill all it’s available space, in the case of 9-patch images suggested in the plugin page only the instructed areas would be stretched leaving the rest of the content centered.
I struggled a lot to work even with third party tools to elaborate a working 9-patch but with little luck, and if we desire to use a complex graphic element instead of a full color or simple logo this approach would be limited, so next step we’ll make behave our images.
XML bitmap for image metadata
To tell the native splash screen to not stretch our image and keep it centered in the visible area we can use XML bitmat files to specify metadata about our images.
In each drawable-* directory we’ll have to update the images names as they cannot match the XML file name, also because each name gets stored during build phase to create a resource ID we should use a new name for the XML files as well :
/hellosplash/HelloSplash/platforms/android/res/drawable-ldpi/splash_image.png
/hellosplash/HelloSplash/platforms/android/res/drawable-ldpi/splashscreen.xml
All the xml files shall have the same content, where we specify to not stretch the image and supply its path, that being in the same directory of the xml is the name of the png alone :
<?xml version="1.0" encoding="utf-8"?>
<bitmap xmlns:android="http://schemas.android.com/apk/res/android"
        android:gravity="center"
        android:src="@drawable/splash_image" />
Now that we changed the files names we must update the root config.xml too in order to make it fetch our XML files, which will tell the system how to handle the images they point to :
<preference name="SplashScreen" value="splashscreen" />
Now that our images do not get stretched lets adjust the background-size of our HTML replica :
#splash {
    background-attachment: scroll;
    background-color: #ecffb1;
    background-image: url(../img/splash.png);
    background-position: center center;
    background-repeat: no-repeat;
    background-size: 900px auto;
    display: block;
    height: 100%;
    width: 100%;
    position: fixed;
    z-index: 10;
}
Recap, customizing callbacks and effects
Let’s review all the necessary steps to address each phase of the startup process :
- To change the default Application background create a native child theme style.xml and update the AndroidManifest.xml
- Enable the SplashScreen PhoneGap plugin by adding the two parameters, duration and path, in the project root config.xml. The path must have the name of the XML bitmap file we’re going to create to tell to not stretch our images that will reside with the XML itself in each drawable-* folder
- In the index.js we will call the hide method to remove the native splash screen after a 1,5 seconds delay inside the document ready callback to ensure that our HTML is visible, at the same time we will fadeOut the HTML replica of our native splash screen to gracefully present our web app.
Regarding the timing to hide the splash screen and fade out the HTML replica, I’m using the document ready function just as an example.
If your app needs to fetch some data, either from the web or from internal storage, or you need to startup any kind of service before the UI is rendered, you can call the hide and fadeOut functions with a custom callback in response to the correct event.
Also you can customize the HTML splash replica fade out how you want, you could mimic the system spring out effect by using a CSS3 scale animation from 1 to 0.7 together with the opacity fade from 1 to 0
or you could do the other way around, your web app UI spring in, placing itself on top of the HTML splash replica
it’s really up to you 🙂 .

Hi
I’m using phonegap online build… and I want to remove the initial black screen before splash screen and i.e title (app name)… I’ve tried all the examples with Theme.NoTitleBar with no luck. I uploaded your latest code base and the tile still shows with a black background, before the splash screen.
I’m using PhoneGap Android cli-6.5.0 6.1.2… please help this is frustrating the hell out of me.
All I want is just a white or black screen with no text before the splash screen, like your animation.
Please help
Hi James,
in order to change the initial black screen you need to create a child theme from the one you just mentioned, here’s a deeplink to the specific paragraph: http://sresc.io/tLt
In order to achieve this you’ll need to be able to create also the necessary
style.xmlfile where your new background color/image will be fetched and then set the new theme in youAndroidManifest.xml,since I never used Adobe’s services to produce phonegap builds I don’t know if there are specific limitations for doing any of the required steps…
keep us posted
I made an example using v1.3.0 and Phonegap 2.9.1 and does not work me, the application is displaying the image and does not hide the splash and does not pass the page. I can work with a complete example in Android.
Solved my problem, I had defined the splashscreen.xml file. Thank excellent tutorial.
If by any chance you’ve been using PhonegapBuild you could check this out http://community.phonegap.com/nitobi/topics/simple-splash-screen-test-failing?rfm=1
Very useful thank you very much, and, by the way I’m using cordova 4.1.2, in this version if we initiate SplashcreenDelay as :
<preference name="SplashScreenDelay" value="10000" />It would take the whole time, 10 secondes in this example, even if we put
navigator.splashscreen.hide()in onDeviceReady, i don’t know why. Also I was asking if we could integrate a loader instead of splashsreen.Thanks
Glad it helped 🙂
strange the method wouldn’t work, I’m still using cordova 3.4.0 so dunno if it’s a regression bug introduced with new releases,
not having more info I would check if the code chunk were
navigator.splashscreen.hide()is present is reached at all (maybe some logic flow fail?),I’d put a
console.log("test")right after it,Also I’d make the timeout even longer to try issuing the command via console in real time after application started and see if it works,
if none of above tests gives positive result then it’s time to check their bugzilla and file an issue